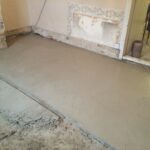
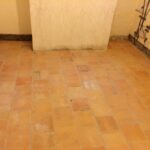
During the years from the last war up until the mid ‘80s there was a tendency for suspended wooden and brick floors in older houses to be removed and a concrete slab laid in their place. Suspended floors were always vented, and brick floors often lay on natural bases; thus moisture below was generally managed by one means or another. Impermeable concrete does, however, cause great problems with the moisture that naturally lies beneath the building.
Because this moisture used to be able to breathe into the atmosphere, either by evaporating into the under-floor space in the case of a boarded floor, and then being vented out through the brick vents, or being taken up by the bricks and seeped into the room air in a brick floor, it never caused any undue problems in the adjacent walls.
However, with a concrete floor the moisture is unable to act in this way, and so it’s only path out is to rise up the walls. As no effective damp proof course was ever built into walls in period houses, internal and external walls can often suffer from rising damp up to two or three feet above the floor.
Injecting a damp course into brickwork has, in our experience, never produced an effective barrier to the moisture, and installing a continuous physical damp course in the walls is very expensive and highly disruptive to the wall structure. More importantly, by reducing the moisture content that naturally occurs in a wall built without a damp-course; this action will change its whole dynamic structure, and will reduce the long-term viability of the brick or flint work to cause problems over time.
We have, therefore found that the best method of addressing a damp problem that is occurring at the base of internal and external walls where concrete floors have been laid, or where brick or pamment floors exist is to install “Limecrete” floors.

Limecrete floors are fully breathable and will allow moisture to move in and out of the floor structure thus reducing the possibility of causing damp patches at the base of the internal or external walls.
Our floors are constructed in a new, three part system that gives a very durable base and can be finished with any breathable surface, from brick through to wooden boarding.
Our system uses as the base a new aggregate based upon foamed glass, a light-weight aggregate that has excellent insulation properties, that is non-flammable and has a superb performance as a free draining layer.

It is prepared from recycled glass and has no organic content that can deteriorate. We believe that this base has a great advantage over the old Lightweight Expanded Aggregate (LECA) that is commonly used because of its thermal and non-organic properties and its ability to bind into a firm base by compression.
Onto this base is laid a “slab” layer of crushed chalk and hydraulic lime, and a proportion of sharp sand to improve workability, with the chalk sourced from a local chalk pit at a size varying from 0 to 6mm, which is in common agricultural use.
Once this layer has been allowed to cure for a period a second “screed” layer of the same material is laid as a finish. If bricks or pamments are to be laid onto this screed a proportion of course sand is added in order to increase the adhesion.

The depth of the finished floor will be 15 inches, providing an excellent thermal barrier that will handle any moisture present, will not move or crack, and can carry any non-ceramic finish, giving a workable solution to many damp problems in older walls.
A floor heater element can also be laid in the screed layer where bricks or pamments are used as a finished floor.
Construction of Limecrete Floor
Floor Finish e.g. Pamments / brick / boards on 50mm x 25mm batten
25mm – 50mm screed 2 parts 0-10mm limestone: 1 part sharp sand : 1 part NHL 5
Depth will depend upon type of floor finish
100mm slab 1 ½ parts 0 – 10mm limestone :1 Part Sharp Sand : 1 part NHL 5
Membrane
175-200mm finished thickness foamed glass 10 – 20mm
Membrane

If a heat mat is to be laid, it is important that there is no barrier to the moisture, and research has found that the best configuration is to use a Devi single element mat with an output of 180 w per sq. mt.
This is installed onto the flat slab layer and the screed laid over the top of it, ensuring that there are no touching wires or kinks in the element, and the thermometer sender is laid between two wires.
Where pamments are being laid over the screed, these are laid directly onto the screed whilst it is levelled; thus giving a good suction to ensure stability.

Each pamment is jointed with a paste made from mixing NHL 3.5 lime and water, and once the screed has gone off enough to walk on, the joints can be pointed to give a satisfactory finish.

Once the floor is finished, the skirting is cut in leaving a fully breathable structure where the moisture content is managed, and at the same time the stability will be ensured, thus preventing the tendency for moisture to percolate into the base of the walls.
